The document’s Header is a section of Text that appears at the top of each page’s margin. This is an excellent option to consider when displaying extra information such as the title, author, page number, and objects and pictures that add design to your document. Today, we are going to show you how to change the header section in word.
Headers may also assist in keeping papers more ordered and readable. For the vast majority of users, creating professional-looking headers in Microsoft Word is a piece of cake. However, experienced users may encounter issues when dealing with papers that need more than one Header, such as those used in business or academic works. The headers on the cover page, the main content, and other pages in various orientations may all be distinct.
The Header and footer are sections of the document that appear in the top and bottom margins, respectively. The Header and footer are sections of the document that appear in the top margin and bottom margin, respectively. Additionally, headers and footers often include extra information such as page numbers or dates, an author’s name, and footnotes. This information helps keep lengthy papers structured and more straightforward to read. All of the Text you provide in the document’s header or footer will show on each page.
There Are two ways to change the header section; they are pretty easy to do and simple enough to remember after you practice them a couple of times. We will show these strategies in detail in the lesson that follows. Remember that we wrote this post with novices in mind, so don’t be afraid! We’ve also made it a point to provide images for each stage so that you can follow along with us at every turn.
The following information will walk you through creating a different header for each page in Microsoft Word without delay.
Changing Headers Using the Preset Headers Option
We will show the Design tools of the Header in this approach, and you will be able to design two alternative header choices. The first option is helpful if you merely want the first page of your document to have a different heading than the remainder of the content does. The other option lets you create two separate headers for each odd and even page by selecting the headers from the drop-down menu.
The following are the actions to take to access the Design tools in the Header.
Step 1: Allow me to open a Word document to get this process started. Alternatively, you may utilize your paper if you already have one written up. You may also start from scratch by creating a new blank document.
However, even though we won’t need anything in the main body of the document, make sure you have a document with at least 2-3 pages so that we can see how each header choice works. You may fill in the blanks with random Text or repeatedly hit the Enter key to reach the required number of pages.
Step 2: Once our document is complete, go to the Insert tab and choose Header from the drop-down menu. Then, click on the Edit Header option to make changes at the bottom of the menu. Alternatively, you may reach the header area of your document by double-clicking the top edge of your page.
Step 3: Now that the header section has been enabled, you will be sent to the page’s Header & Footer Design portion. You’ll notice two choices to pick from Different First Page and Odd & Even Pages, all available. Select a different header for the first page of your document than the remainder by using the Different First Page checkbox.

Select the checkbox next to Odd & Even Pages if you want the odd-numbered pages to have a different header than the even-numbered pages, on the other hand.
Step 4: Add Text to the top of your page Fill in the blanks with the appropriate material for each heading. After finishing, double-click outside the header section or hit the Close Header and Footer button on your keyboard to return to the main content. By employing this simple technique, you can easily change existing headers in Microsoft Word.
Using Section Breaks To Change Headers
Segment breaks mark the conclusion of one section and the start of another. Section breaks help organize your document’s parts. This makes configuring different headers for each page much easy.
How to add section breaks to your document.
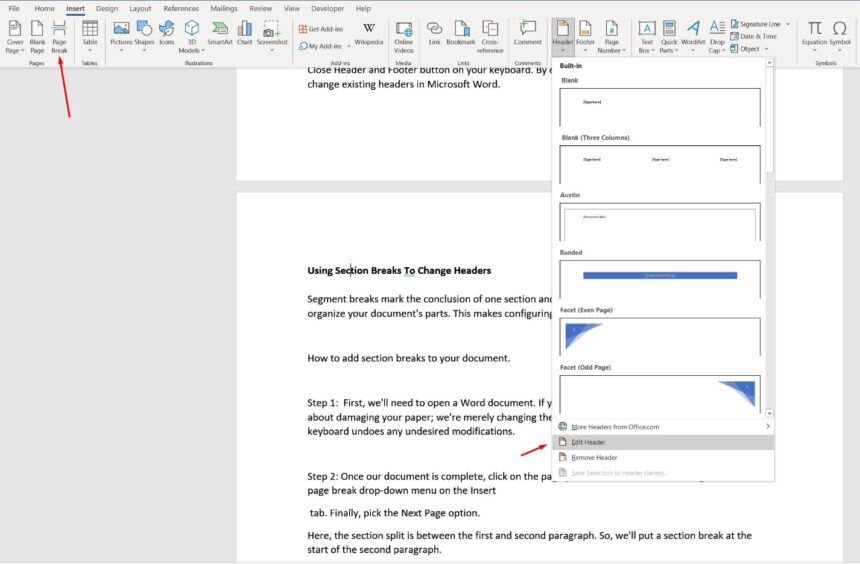
Step 1: First, we’ll need to open a Word document. If you already have one open, use it. Don’t worry about damaging your paper; we’re merely changing the heading. After all, typing CTRL + Z on your keyboard undoes any undesired modifications.
Step 2: Once our document is complete, click on the page you want in a different heading. Then click the page break drop-down menu on the Insert
tab. Finally, pick the Next Page option.
Here, the section split is between the first and second paragraphs. So, we’ll put a section break at the start of the second paragraph.
Repeat the procedure after the section. MS Word placed paragraph spaces before and after the section and shifted it to a new page.
Step 3: Click the Header drop-down menu on the Insert tab. Then choose Edit Header from the menu. To access the header section, double-click the top edge of the page.

Step 4: To change the Header for the newly formed page, we must unlink it from the old header type. Click on the link button to the Previous button on the Header & Footer Design tab while staying in the header section. Now you may add material to the Header. Note that you must do this for each section you wish to have a different header. Click outside the Header or close the Header and footer to return to the main content.
That’s it! Section breaks now separate the headers on each page of MS Word.
Conclusion:
Now we know how we can add headers and footers and change them differently. Our How to change header section in word teaches you so much more than just altering the Header and footers