Introduction
While working with excel numbers can be a daunting task, we also sometimes have to work with dates to create deadlines or expiration dates or even to create a financial analysis for some time. So today, we will learn this nifty trick. So let’s begin with how we can Add 6 Month To A Date in excel. There is two way we can do this task. The two functions of Excel that we can use are the Date Function And Edate Function.
1.Date Function
Lets Start with the Date function; this Function uses number-based dates, which can often become tricky, but this method is precise. So we can easily use the date formula to add 6 months to a date in excel. 
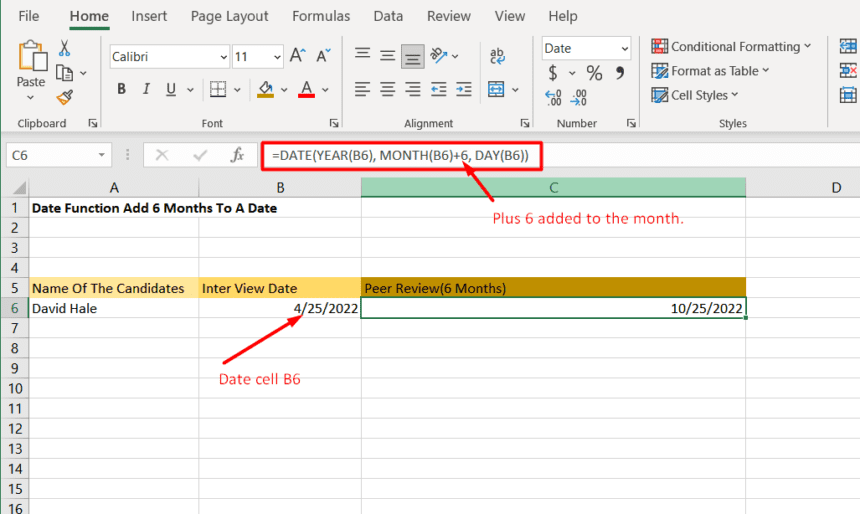
Here we create a peer review for a new trainee in 6 months.
1st Step: We will open an excel file and add the required name of the calculation; we have used the Candidates Name.
2nd Step: Enter The base date using slashes and add year, months, and day and excel will take it as a date. We have placed the date in cell B6. So our formula is going to be done using B6 cell. You will have to use whichever cell you use to put your dates.
3rd Step: Here, we have to implement the formula. The formula we use is “=DATE(YEAR(B6), MONTH(B6)+6, DAY(B6))” Here =Date is The Function, subsequent Use parenthesis Followed by Year Click on the cell with the date. Here B6 Is the cell we have used for the date. Then use a comma to separate the year and type the month and click the date cell, use a comma and type day and click the date cell again and close parenthesis. Now we have the basic Formula In Place.
4th Step: Now, all we have to do is add +6 to the end Parenthesis of our Month; this will finish our task.
Note: You can now use the 4th step to add or subtract days, months, and years from dates.
You now have a clear understanding of how to add 6 months to a date using the date function.
- Edate Fuction
Edate Function Is a lot easier to use, and it can also use month name, but it might require some additional cell formatting which I will be showing you. Excel uses serial numbers to store data, so Edate will show you raw serial data without formatting. 
1st Step: Enter your starting date. You can make a month’s Column, or you can forgo the month’s Column. Our starting date is in the B6 cell.
2nd Step: Take a cell where you want the result and use the Formula “=edate start parenthesis click on start date cell and give comma and add 6 or the number of months you need to add and close parenthesis and press enter. If your dates are not formatted, it will show numbers as shown in our due date cell.

3rd Step: Right-click on the cells and select Format Cells, choose dates and choose the format you desire, and press okay, and the dates should work flawlessly. 
Notes: You can use any number of months to date and even subtract. If you need to add years, add or subtract 12 months.
Conclusion:
Now you have a clear understanding of how to Add 6 Months To A
Date in Microsoft Excel.
This is a crucial function for people in business and dealing with deadlines
for salary sheets. In addition, the date function can come in handy for people
who use a lot of subscription-based spreadsheets to keep track of the expiration
dates. Finally, date functions are crucial for financial analysts who can use
the Function to perform reporting, operational metrics, and economic
forecasting. Financial analysts can use the function to perform reporting, operating metrics, and financial forecasting.


Hey people!!!!!
Good mood and good luck to everyone!!!!!
Hey people!!!!!
Good mood and good luck to everyone!!!!!